PICO-8 raycaster basics (Dark Streets devlog #1)
First steps in writing a first-person shooter in PICO-8
I have been playing around with PICO-8 for a few months now. PICO-8 is a fantasy console, emulating a device-that-could-have-existed somewhere around 30-40 years ago. It includes great editors and an API designed for game development. PICO-8 is rather limited in resources, but that is the part of its charm - it makes you think about the efficiency of the code you write and avoids feature creep.
In this post, I will start writing a first-person shooter similar to Wolfenstein 3D and other early FPS games, beginning with basic solid-color raycasting.
Credits
Thanks to Lode Vandevenne for great tutorials on raycasting
Lode's Computer Graphics Tutorial
Intro
Most modern 3D graphics (at their core) are created by rendering scenes that consist of triangular polygons, which involves a lot of calculations dealing with coordinates, depth, occlusion, texture mapping, vertex and pixel shaders, all of which are heavily parallelized and processed by dedicated GPUs.
About 30 years ago, such amount of computing power was simply not available on a single machine. Even simple textured 3D meshes might be difficult to render in real time. Instead, game developers used various clever techniques to create an illusion of three dimensions, while the core of the game logic is two-dimensional. This approach is often referred to as 2.5D. Wolfenstein 3D, Rise of the Triad, Doom 1 and 2, Duke Nukem, and Blood are all examples of 2.5D graphics, as they do not use a "true" 3D engine.
One of these clever techniques is raycasting. Level's walls are drawn in thin vertical slices, which allows drawing sections of walls that are further, smaller, thus creating a perception of depth and perspective.
Setup the cart
First, setup the PICO-8 cart.
In the sprite editor, create a sprite that will be used for a wall. Set sprite flag #0. This flag will make it easier to define what sprite is a considered a wall.
In the map editor, place several walls.
In the code editor:
Set up the _init, _update, and _draw functions.
function _init()
end

function _update()
end

function _draw()
end
Create a camera object. This will be the point from which player looks at the world.
cam={
	x=12,
	y=12,
	a=0, -- angle at which camera is looking
	w2d=2 -- width-to-distance (fov 90)
}
Note: W2D is a width-to-distance ratio used in calculating the field-of-view angle and how large objects appear at a distance (more on that later, when we get to drawing walls). Value of 2 means the field-of-vision is approximately 90 degrees. Value of 1 means the field-of-vision is approximately 60 degree. For all intents and purposes, I found 90 degrees to work the best.
Create a function to handle camera movement and turning by changing cam.x, cam.y, and cam.a. Call this function in _update.
function controls()
	if btn(⬅️) then
		cam.a+=0.01
	end
	if btn(➡️) then
		cam.a-=0.01
	end
	if btn(⬆️) then
		cam.x+=cos(cam.a)*0.5
		cam.y+=sin(cam.a)*0.5
	end
	if btn(⬇️) then
		cam.x+=cos(plr.a)*-0.25
		cam.y+=sin(plr.a)*-0.25
	end
end
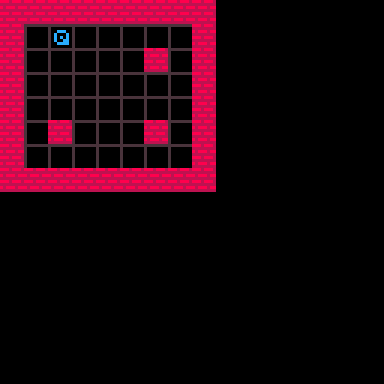
For debug purposes, we can draw the map and the position of the camera on the screen in _draw. It will make it easier to see which 3D object correspond to which 2D objects on the map.
map(0,0,0,0,16,16)
circ(cam.x,cam.y,2,12)
We should get something like this where we can freely move around the map.
Raycasting
This is the key algorithm that makes the 3D illusion possible. In this post, we will start with drawing simple solid-color walls and then add textures, multiple floors and transparency in the future.
Cast a ray for every vertical 1-pixel slice of the screen, totalling 128 rays (PICO-8's horizontal resolution). Call the raycast function in _draw. SCRX is the screen X coordinate for which the ray is cast.
for scrx=0,127 do
	raycast(cam,scrx)
end
First step is to calculate the vector for each ray. Assuming that our field of view is 90 degrees wide, the calculation can be something like this. 0.25 is 90 degrees in PICO-8, so start at 45 degrees to the left (positive angle value), and cast a ray for each 0.25/128 degrees
function raycast(cam,scrx)
	local raya=
		cam.a+0.125-0.25*scrx/128
	local rayvx,rayvy=
		cos(raya),sin(raya)
end
(We will revisit this later)
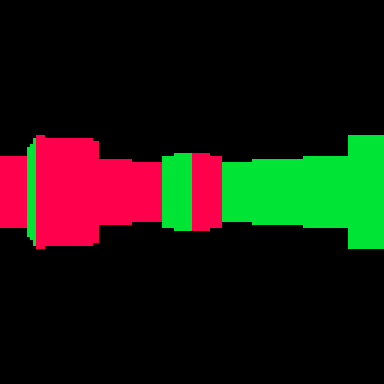
To better visualize it in 2D, we can draw a line for each ray:
line(cam.x,cam.y,
	cam.x+rayvx*64,
	cam.y+rayvy*64,8+scrx%8)
We will get something like this. Walking and "looking" around should draw the rays correctly from the camera position.
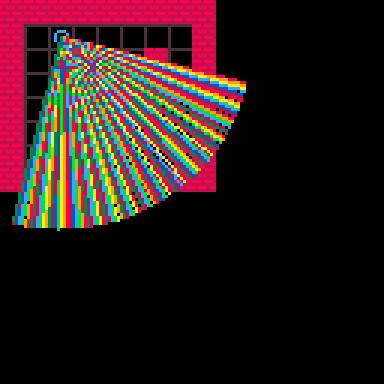
Looks good so far. To simplify what we see and do for the next few steps, we can cast a single ray for the middle of the screen. (We will reverse this later)
--for scrx=0,127 do
--	raycast(cam,scrx)
--end
raycast(cam,64)
Now we need to figure out where the ray hits a wall. We can take advantage of the following facts:
- Walls are flat. This means they can be drawn by sets of vertical lines or slices.
- Walls are of the same height. This makes it easy to calculate wall-height-at-a-distance (we will elaborate on this later).
- Walls are aligned to the grid i.e. PICO-8 map cels. This means that to find where a ray hits a wall, all we need is to find where the ray intersects a certain value on X or Y axis. (Tangent: As opposed to more complex geometry like Doom, in which case we would need to find intersections of the ray with a arbitrary segments, which is more computationally expensive and is the main reason for famous BSP trees)
The idea of the algorithm is: Starting at the camera position, move along the ray's vector, check every map cel, until that cel is a wall. How do we "move along the ray's vector" though? The simple approach is to move in steps of the same pre-defined length. However, that will not be precise at larger step sizes, and expensive (and still not precise enough) at smaller step sizes. Instead, we can calculate distances to the next map cel along the X axis and the Y axis, and move to the next closest map cel.
Raycasting algorithm: (original)
- Start at X,Y (camera position)
- Calculate DIST2X, the distance we need to travel on the ray to reach the next map cel along the X axis
- Calculate DIST2Y, the distance we need to travel on the ray to reach the next map cel along the Y axis
- Move the lesser of DIST2X, DIST2Y
- Calculate the new X,Y using the ray vector and distance travelled
- Calculate the current map cel using the new X,Y
- Check whether the current map cel is a wall
- If current map cel is not a wall, repeat
This is the approach I used in the first version of the engine. However, it can be simplified and improved further. First, DIST2X and DIST2Y do not need to be recalculated every step because the distance between map cels after the one we start in is always the same (8 pixels). Second, X and Y do not need to be recalculated every step. Instead, start with calculating the current map cel coordinate CELX, CELY, and update them when moving across a cel boundary.
Raycasting algorithm: (improved)
- Start at X,Y (camera position)
- Calculate current map cel coordinates CELX, CELY using X, Y
- Calculate DIST4X, the distance we need to travel on the ray to cross one map cel in the X direction
- Calculate DIST4Y, the distance we need to travel on the ray to cross one map cel in the Y direction
- Calculate DIST2X, the distance we need to travel on the ray to reach the next map cel along the X axis (only relevant for moving out of the starting map cel)
- Calculate DIST2Y, the distance we need to travel on the ray to reach the next map cel along the Y axis (only relevant for moving out of the starting map cel)
- If DIST2X < DIST2Y: (next map cel along the X axis is closer)
- Increment CELX (move to the next map cel along the X axis)
- Subtract DIST2X (distance moved) from DIST2Y (distance still needed to move to next map cel along the Y axis)
- Set DIST2X = DIST4X (reset the distance needed to move to next map cel along the X axis)
- If DIST2Y >= DIST2Y: (next map cel along the Y axis is closer)
- Increment CELY (move to the next map cel along the Y axis)
- Subtract DIST2Y (distance moved) from DIST2X (distance still needed to move to next map cel along the X axis)
- Set DIST2Y = DIST4Y (reset the distance needed to move to next map cel along the Y axis)
- Check whether the map cel at CELX, CELY is a wall
- If map cel at CELX, CELY is not a wall, compare DIST2X and DIST2Y again
Visual explanation:
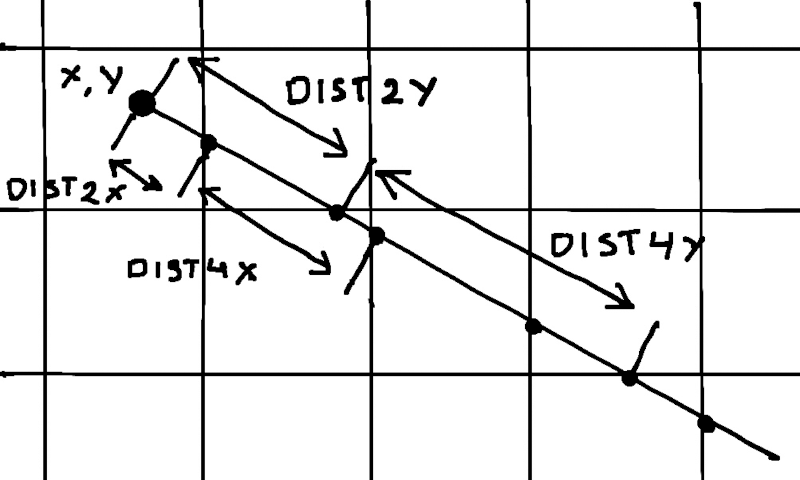
A similar algorithm is used to rasterize lines, and is called Digital Differential Analyzer (DDA).
Don't worry if you don't grok this immediately. It took me a while to wrap my head around it, especially the improved version.
Anyway, here is the code:
DIRX and DIRY keep track of which way the ray is moving for handling negative directions.
DIST and HITA are used for drawing walls.
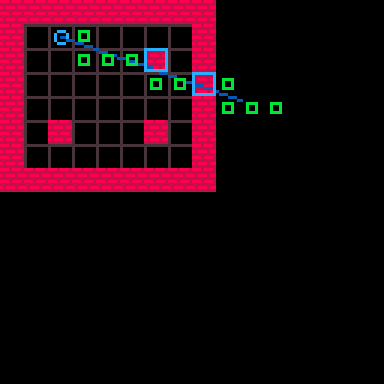
For visualization, we mark every vacant cel and every wall the ray passes.
-- distance traveled
local dist=0
-- current coordinates
local x,y=cam.x,cam.y
-- map cel coordinate and value
local celx,cely=x8,y8
local cel=mget(celx,cely)
-- direction of ray
local dirx,diry=
	sgn(rayvx),sgn(rayvy)

-- distances across map cel
local dist4x,dist4y=
	abs(8/rayvx),
	abs(8/rayvy)

-- distances to next map cel
local dx,dy=
	abs(4+4*dirx-x%8),
	abs(4+4*diry-y%8)
local dist2x,dist2y=
	abs(dx/rayvx),
	abs(dy/rayvy)

-- which direction / angle
-- the wall was hit from
local hita=0

-- perform dda
repeat

	if dist2x=64
You should get something similar to this:
This looks good. Now we can return to casting all 128 rays and remove the visualizations.
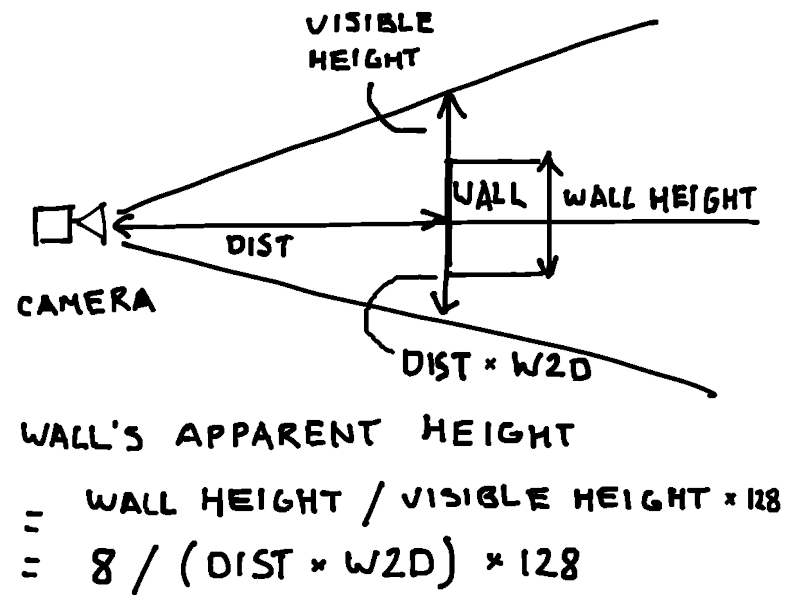
With wall collisions working, drawing a solid-color wall is simple. Using the distance to the wall (DIST) and its height (8), calculate the apparent size on the screen. At distance DIST units, the view height is DIST*CAM.W2D units (see the note about CAM.W2D above), which makes it easy to calculate wall's apparent height on the screen, SCRH. Use HITA to choose different colors for different sides. (HITA has another use for textures - more on that in the next post) Then, draw a line around the middle of the screen (64).
Visual explanation:
Code:
-- ray hit a wall
-- find the wall height
-- on screen
local scrh=8/(dist*cam.w2d)*128
-- find y-coordinate on screen
--local scry=64-scrh/2
-- draw the wall
line(scrx,64-scrh/2,
	scrx,64+scrh/2,
	8+hita/0.25)
break
We should see a colorful pseudo-3D environment that we can move around in:
We did it!
Future plans
In the next several posts, I will go over how to:
- Fix the fisheye effect
- Add head/camera height (important for the floor calculations)
- Add textures to walls
- Add colors to floors
- Add multiple heights for walls/buildings
- Make partially transparent walls
- Add sprites
Next devlog
PICO-8 textured raycaster (Dark Streets devlog #2)