PICO-8 textured raycaster (Dark Streets devlog #2)
Adding wall textures, camera height, and fixing the fish-eye effect in the PICO-8 raycaster.
Previous devlog
PICO-8 raycaster basics (Dark Streets devlog #1)
Result
Textures
I will refer to PICO-8 sprite graphics that are used for walls as "textures".
After a bit of experimenting, I decided to use 16x16 textures for Dark Streets. 16x16 pixels gives a decent resolution for first-person perspective, and textures are small enough to have a good variety. Since textures occupy four 8x8 sprites in the spreitesheet, I will be using the upper left sprite for the map. In fact, having 4 sprites per texture will also allow us to use sprite flags to add interesting effects. (more on that in later posts). I will be putting textures on page 1 of the spritesheet.
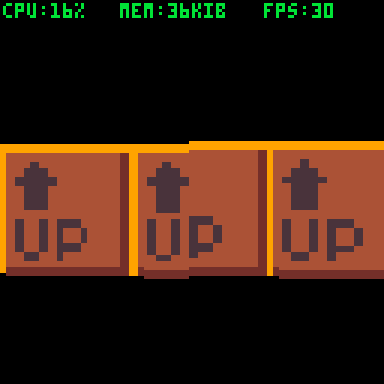
To start out, I created two textures, one of a red brick wall, and one of a brown box with an arrow and text "UP" (you will see why later). I set their upper-left sprites' first flag (#0) to mark them as walls for the raycaster.
Since the raycaster works by drawing vertical lines, we can replace current colored lines with 1-pixel slices of textures. The raycaster as we have it right now checks that a ray hits a wall, knows what sprite the wall is (CEL) and knows the distance to that wall (DIST).
Current raycaster loop: (HITA calculation was fixed)
repeat
	if dist2x=64
Variable HITA (hit angle) tracks which direction the wall was hit from, i.e. which direction the wall faces, expressed as a PICO-8 angle (for consistency). The calculation is shortened, but possible values are: 0 (facing east), 0.25 (facing north), 0.5 (facing west), and 0.75 (facing south). This will be important for some optimizations and corrections.
First, determine the screen position where to draw the wall. This is the same as before.
-- find the wall height
-- on screen
local scrh=8/(dist*cam.w2d)*128
Second, get the texture that will be used for this slice of the wall. Because we will need to draw graphics to an arbitrary position and size on the screen, we need to use PICO-8's SSPR function, and it uses spritesheet coordinates instead of sprite numbers. Since the map is drawn using 8x8 pixel cels, and we decided to use 16x16 pixel textures, we need to find the upper left corner of the corresponding 16x16 texture.
-- get the texture
local ssx,ssy=
	((cel%16)*8)16*16,
	((cel16)*8)16*16
SSX, SSY stand for SpriteSheetX and SpriteSheetY and are upper-left pixel coordinates of the texture in the spritesheet.
In the spritesheet, there are 16 sprites per row, and each sprite is 8x8. Thus, CEL%16 is the "column", and CEL16 is the "row" of cel's sprite in the spritesheet. Multiplying these by 8, we get the pixel coordinates of cel's sprite in the spritesheet. But since we want the entire 16x16 area, divide without remainder and then multiply by 16 to "round" the cel's sprite to the texture we need.
We found the texture. Now we need to find which vertical 1-pixel slice (column) of the texture we need to draw. To do that, determine where exactly on the wall the ray landed. We can obtain the exact X,Y coordinate of where the wall is hit by multiplying the ray vector by DIST. However, a wall can only be hit horizontally or vertically, so we only need only either X coordinate (for vertical hit) or Y coordinate (for horizonal hit).
-- get the texture column
local ssc=0
if hita==0 or hita==0.5 then
	-- wall faces east or west
	ssc=((cam.y+rayvy*dist)%8)*2
else
	-- wall faces north or south
	ssc=((cam.x+rayvx*dist)%8)*2
end
Using the east/west example, (CAM.Y+RAYVY*DIST) is the absolute Y coordinate of the point the ray hit the wall. Using the %8 modulo on it gets us the Y coordinate within that map cel (0-8, not including 8). Since the texture has 16 column, multiply the result (0-8 value) by 2 to get values from 0-16, not including 16. The rounding will be done automatically when calling SSPR.
Finally, draw the wall:
-- draw the wall
sspr(ssx+ssc,ssy,1,16,
	scrx,scry-scrh,1,scrh)
This function takes a one-pixel wide, 16-pixel tall vertical slice from the spritesheet texture at SSX, SSY, and draws it to the screen for the X coordinate corresponding to the current ray (SCRX) and Y coordinate corresponding to the top of the wall, and stretches the texture slice to the wall's height (SCRH).
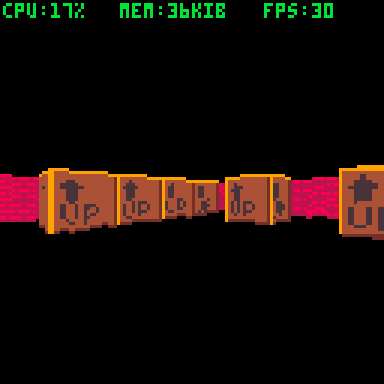
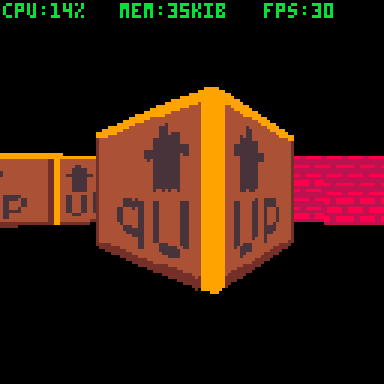
Result:
Correcting the orientation
As you can see, some of the textures are mirrored (the UP texture makes it very obvious). But why? The way we determine the texture column to draw, the columns are always ordered west-to-east and south-to-north, regardless of the direction that we are viewing them from. Since we have the direction the wall faces (HITA), we can mirror the texture when necessary.
if hita%0.5==0 then
	-- horizontal hit
	ssc=((cam.y+rayvy*dist)%8)*2
else
	-- vertical hit
	ssc=((cam.x+rayvx*dist)%8)*2
end
-- fix mirroring
if hita==0 or hita==0.75 then
	ssc=16-ssc
end
Note: Honestly, I don't understand why the textures are ordered south-to-north before correction. I would expect north-to-south, since in PICO-8, the Y axis goes north-to-south (downwards on the screen)
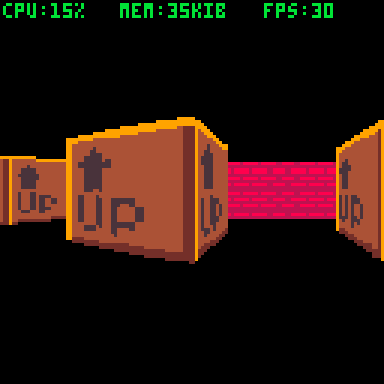
Result:
Camera height
As of right now, the camera is exactly half the height of the wall. This works, but we can change that to give player a different sense of scale, make the head bob, or even implment jumping. First, add a Z property to CAM, so CAM.Z will be the camera height. Then, instead of drawing the walls around Y=64, figure out where on the screen the "floor" is, and, consequently, where to draw the wall.
-- ray hit a wall
-- proportion of screen size
-- to real size
local real2scr=1/(dist*cam.w2d)*128
-- screen y at this distance
-- at height 0 (floor)
scry=64+cam.z*real2scr
-- wall height on screen
local scrh=8*real2scr
REAL2SCR is a proportion of apparent screen size to in-game size at the current distance, to simplify calculations. Right now, it is being used for walls, but will be used for floors and sprites.
Once we have the new screen position SCRY, modify the wall-drawing SSPR call to use it.
-- draw the wall
sspr(ssx+ssc,ssy,1,16,
	scrx,scry-scrh,1,scrh)
To try the camera height in action, modify controls to raise and lower the camera.
if btn(⬆️) then
	if btn(❎) then
		cam.z+=0.1
	else
		plr.x+=cos(plr.a)*0.5
		plr.y+=sin(plr.a)*0.5
	end
end
if btn(⬇️) then
	if btn(❎) then
		cam.z-=0.1
	else
		plr.x+=cos(plr.a)*-0.25
		plr.y+=sin(plr.a)*-0.25
	end
end
Results:
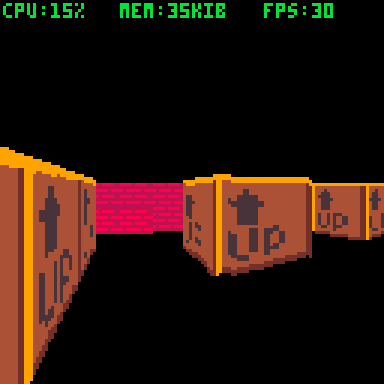
If you raise the camera too high, you will notice how you cannot see walls behind other walls. This is because the raycaster stops at the first wall. We will take a look at this in one of the next posts.
Fisheye Fix
One obvious issue is the fisheye effect, the bulbous distortion especially noticeable next to walls.
Currently, all ray vectors are calculated using angles and are of the same length.
local raya=
	cam.a+0.125-0.25*scrx/127
local rayvx,rayvy=
	cos(raya),sin(raya)
This results in an effect where looking at a flat, straight wall, it will appear closer in the center of the screen and further on the edges.
To address this, we can change the way the rays are calculated. Instead of using same-length rays radiating from the origin evenly, calculate rays to end on the same flat plane (a "screen" of sorts).
One way to calculate the ray vector like this is by adding a camera vector and a multiple of a perpendicular vector.
     O camera
    /|
   / | camera vector
  /  V
 *<--*
   perpendicular vector
In our case, the camera vector is (CAM.VX, CAM.VY). The vector perpendicular to, and pointing to the right of, the camera vector is (-CAM.VY, CAM.VX). (You can get this result by adding a third dimension and performing a cross product with a unit vector in Z plane, but what we have here is sufficient) When calculating a ray for SCRX, take the camera vector and add the perpendicular vector multiplied by width-to-distance ratio (to account for field-of-vision) and multiplied by SCRX proportionate to the screen width (128)
local rayvx,rayvy=
	cam.vx-cam.vy*cam.w2d*(scrx-64)/128,
	cam.vy+cam.vx*cam.w2d*(scrx-64)/128
Calculating the rays this way gets rid of the distortion.
Raytracer function
Here is the raytracer functions at the end of this devlog.
function raycast(cam,scrx)
	local rayvx,rayvy=
		cam.vx-cam.vy*cam.w2d*(scrx-64)/128,
		cam.vy+cam.vx*cam.w2d*(scrx-64)/128

	-- distance traveled
	local dist=0
	-- current coordinates
	local x,y=cam.x,cam.y
	-- map cel coordinate and value
	local celx,cely=x8,y8
	local cel=mget(celx,cely)
	-- direction of ray
	local dirx,diry=
		sgn(rayvx),sgn(rayvy)

	-- distances across map cel
	local dist4x,dist4y=
		abs(8/rayvx),
		abs(8/rayvy)

	-- distances to next map cel
	local dx,dy=
		abs(4+4*dirx-x%8),
		abs(4+4*diry-y%8)
	local dist2x,dist2y=
		abs(dx/rayvx),
		abs(dy/rayvy)

	-- which direction / angle
	-- the wall was hit from
	local hita=0

	-- perform dda
	repeat

		if dist2x=64
end